Wednesday 25 June 2014

The Importance of Thermostats

Lately on social media and forums, I have been reading more posts regarding animals being burned and people not using thermostats. These people sadden me deeply as injury can be avoided with such a simple piece of equipment. I personally think that all reptile keepers should have thermostats on every enclosure. For the cost of £15 - £50 depending on where you shop, you're safe guarding your animal and ensuring that the temperatures they need are regulated and correct.

I understand that several years ago, thermostats were unheard off when less understanding and less equipment was available for reptiles and therefore some hobbyists would argue that they are not needed. I strongly disagree. If something new has come out that can improve your life, you would buy it so why not do the same for your animals? NEVER buy a reptile or animal of any description if you are not willing to spend money on the correct equipment.

There are three main types of thermostats for reptiles and these include: mat stat, dimmer stat and pulse stat. They are vary in price and effectiveness.


  • Mat Stats are the cheapest of the three and work by heating up to the required temperature and turning off when they go above it. This type of stat can be used with a heat mat and ceramic bulb although with it turning off and on, it will shorten the life of the bulb.


  • Pulse Stats are slightly more expensive than a mat stat but are more reliable and regulate temperatures better. A pulse stat sends constant bursts of heat and slow down the bursts when the acquired temperature has been reached. As they pulse on and off they can't be used with all bulbs as this can make them blow. I myself use pulse stats on both my vivariums and my rack system. They can also control multiple mats as long as you don't go over the maximum wattage.


  • Dimmer Stats are mainly used for bulbs as they generally need a minimum of 40 watts to run. They control the temperature by regulating the light that comes from the bulb by dimming when it gets too hot and brightening when it gets too cold.


Furthermore, another piece of equipment any keeper should invest in is a temperature gun. I swear by both my thermostats and temperature gun when caring for my reptiles and I can't recommend them enough.

How to set up a Reptile Enclosure

Before anyone buys a reptile it's vital to know how to care for the animal properly. I have been reading too many posts online were people have bought a snake or lizard without a few pieces of equipment and have been asking 'why has my animal got burns?' etc. I have also seen people asking 'where do you put a probe for a thermostat?'. If you're unsure about equipment or setting up your reptile's new home, then this post is for you.

Equipment


  • Thermostat
  • Heat Mat or Heat Strip or Ceramic Bulb or Basking Bulb
  • Bulb guard (with heat resistant paint) if required
  • Substrate
  • Vivarium or Rack System or RUB/tub
  • Humidity Reader
  • Temperature Reader (Temperature Gun)


Rack Systems


  • If you have decided to keep your reptiles in a rack system then your set up should be as follows: Firstly, you will need to tape down your heat mat or heat strip to the shelfs using aluminium tape to stop the heat source from sliding. The heat mat should cover roughly 1/3 of the floor space of the rub/tub.
  • Next you will need to set up your thermostat. This should be placed on the middle of your shelf system. For example if you're housing three animals, your thermostat needs to be placed on the second shelf above your heat source. Use a screwdriver to set your required temperature. Check the temperature inside the rubs/tubs 24 hours after you first turn on the heat mats and thermostat. Ensure the temperature is correct inside the rubs/tubs and adjust the thermostat accordingly.
  • Place your boxes and substrate on top of the taped down mats.
  • If you want to a add humidity reader in your set up, ensure that you purchase the version with the probe, as they last longer and are more accurate. Place the probe towards the bottom of the rub and towards the middle.


Thermostat Probe

Rack System


Vivariums fitted with heat mats
  • As a vivarium is made of wood that is not a heat conductor, your heat source will need to go inside the tank under the substrate. The heat mat should cover 1/3 of the floor space of the vivarium.
  • Next you will need to fit a thermostat which, is vital to ensure your reptile does not burn itself with the mat being inside the enclosure. Ensure the probe is placed just above the substate, above the heat source. Secure the probe if required to keep it in place. Then using a screwdriver, set your required temperature.
  • Place in your substrate and check the temperatures every few hours and if they are too low, turn up your thermostat and if they are too high turn it down. You can also add more bedding if needed.
  • If you want to add a humidity reader in your set up, ensure that you purchase the version with the probe as they last longer and are more accurate. Place the probe towards the bottom of the vivarium and towards the middle.

Vivarium


Vivariums fitted with ceramic bulbs

  • When using a wooden vivarium, heated by a ceramic bulb, you will need to start by fitting the correct socket or bulb holder, this should be at one corner of your enclosure. Screw the bulb into the fitting. Add the bulb guard around the heat source and secure firmly in place with screws. 
  • Next you will need to add the thermostat. Place the thermostat probe under the bulb and above the substrate. Secure in place if required. Then using a screwdriver, adjust the thermostat accordingly.
  • Place in your substrate and check the temperatures every few hours and if they are too low, turn up your thermostat and if they are too high turn it down. Ensure you are achieving the temperature gradient that you require.
  • If you want to add a humidity reader in your set up, ensure that you purchase the version with the probe as they last longer and are more accurate. Place the probe towards the bottom of the vivarium and towards the middle.

Terrariums with heat mats

  • When using heat mats to heat a terrarium, some people will place the mat inside the terrarium and some will place it underneath. There have been cases that the glass has cracked due to the heat from the mat being inside the terrarium. Ensure the temperatures are monitored thoroughly. You can use polystyrene to distribute the heat more evenly. The heat mat should cover 1/3 of the floor space of the terrarium.
  • You will need a thermostat to regulate the temperature of the heat mat. Ensure this is placed above the substrate, above the heat mat. Use a screwdriver to adjust the thermostat accordingly.
  • Add your substrate and check temperatures every few hours and adjust them accordingly. 
  • If you want to add a humidity reader in your set up, ensure that you purchase the version with the probe as they last longer and are more accurate. Place the probe towards the bottom of the terrarium and towards the middle.
To view more information on reptile housing click here and for further information on heating click here.

Saturday 14 June 2014

Reptile Hunters Belfast

In my eyes, nothing beats going to my local Belfast reptile shop to see some wonderful and rare animals. It's also a great source for learning how to care for your animals and a wonderful way to meet new people.

My favourite Northern Ireland reptile shop is Reptile Hunters. If you live in Belfast or plan on visiting, these guys are worth checking out for all your reptile needs. They stock everything from rare animals including the shop mascot, Sadam the rhino iguana, who is worth going to see and one of the only rhino iguanas in Belfast! Reptile Hunters also stock dried goods, vivaruims, thermostats, live foods and decor with the best varity to choose from in Northern Ireland.


Saddam the rhino iguana! That you may have seen at the side of my blog.


Not only is it well stocked but the staff are very friendly, helpful and approachable. Everytime I go into the shop, I feel welcome and comfortable and I enjoy being there. The shop is also very clean and modern compared to other shops I have been to. It's a great reptile shop.

I will always remember my first visit to the shop, and if I had not discovered it I don't think I would have ever considered getting a reptile. After being allowed to handle a few different snakes, I just had to get one and I started with a corn snake and soon progressed to royal pythons and leopard geckos. What started as a passion has quickly turned to an obsession and I soon hope to get a boa from my favourite reptile shop. To contact this fine establishment click here.


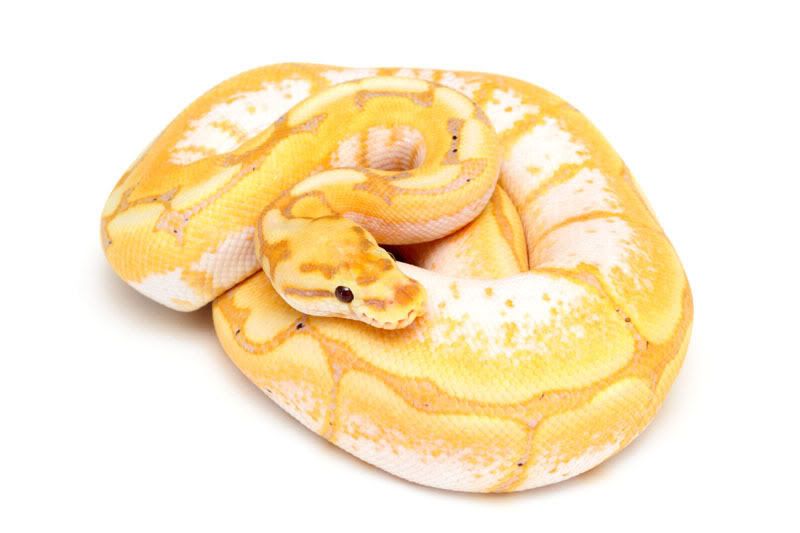
Female Pied Royal Python


Monday 28 April 2014

Boas - BCC and BCI Differences

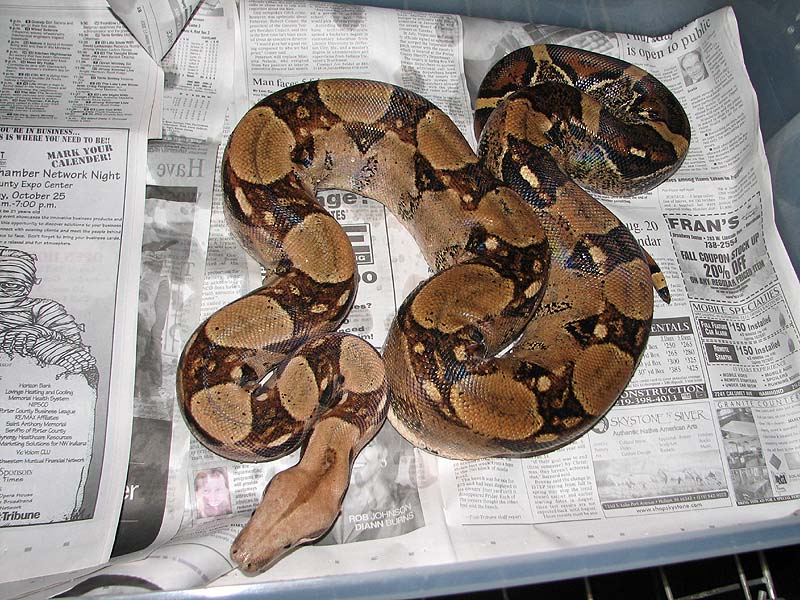
Today's post is about boas and how they are usually divided into either BCC (Boa Constrictor Constrictor) or BCI (Boa Contrictor Imperator). 

BCI
These boas are generally smaller when fully grown and more tan in colour than their BCC cousins. Their size will be different of course if you consider a hybrid. 
A few examples of BCI boas are;
1. Colombian
2. Central American
3. Mexican
4. Hog Island
5. Crawl Cay
6. Corn Island
7. Nicaraguan
8. Costa Rican

9. El Salvador


BCI


BCC
BCC boas have more arrow shaped heads, are darker in colour and are longer than BCI boas. Furthermore, their tails are brighter red and of course this is all dependent on if they are full blood or hybrids.
Some examples of BCC boas;
1. Amaral's boa
2. Red Tailed boa
3. Common northern boa
4. Tumbes Peru boa
5. Ecuadorian boa
6. Dominican clouded boa
7. Argentine boa
8. Orton's boa
9. Pearl Island boa


BCC


My next snake will be a boa as I want to dive into a new species. Boas are live bearers which means no eggs to incubate. They can have in the region of 30 babies in one litter, so care should be given if you are thinking of breeding boas. Generally they have a reputation of being aggressive feeders, especially when compared to royal pythons. Why did I allow my boyfriend talk me into getting a boa? Ah well, it'll be him who cleans the poo. .

To find out more about boas, visit Boa Constrictors or view my earlier post about boas

Sunday 27 April 2014

My Favourite Ball Python Morphs

One of my favourite type of reptiles is a royal python due to the variety of colours and genetics. In today's post I have decided to keep things simple and list twenty-five of my favourite morphs and genetic traits. 

1. Super Orange Dream Spider Fire Yellowbelly

First produced by OzzyBoids in 2012. This is my dream python. The colours really grab your attention and because it has 4 genes, it would make a very interesting breeding project. 

2. Nuclear Spinner

First produced in 2011 by Mike Wilbanks. I like this snake because it looks so clean and the reduction in the head pattern is lovely. Almost looks leucistic with a bit if striping. 

3. Butter Genetic Stripe

The contrast of this snake is gorgeous. The butter gene really smooths out the tones. I'd love to have one of these in my collection.

4. Purple Passion

Produced first by NERD in 2011. What can I say, I'm a girl and I love purple! 

5. Fire Spider Banana

First produced by Brock Wagner in 2011. I love the bright tones and the high whites in this snake. The subtle hints of purple really set this snake off.

6. Enchi KillerBee

First produced in 2011 by NERD. I'm a huge fan of the bee gene so adding more genes to it will always make the offspring beautiful and more interesting. 

7. Calico Champagne Pastel

Sunglasses on for this one. I love the vivid neon tones to this snake. I have no other words to describe this beauty.

8. Lesser Desert Enchi Spider Yellowbelly

First produced in 2013 by Royalsnakes & Austrian Reptiles. Love how clean this is.

9. Lucifer Pastel

First produced by NERD. The contrast of the black and yellow is out of this world. A truly beautiful snake.

10. Orange Dream Bumblebee

First produced in 2012 TnT Reptiles. It's simply beautiful- colours, stripes, contrast, the whole snake!

11. Orange Dream Spinner Blast


12. Mojave Bumblebee Calico

First produced in 2012 by Markus Jayne Ball Pythons.

13. Nuclear Superfly Enchi
First produced in 2013 by Cody St. Cyr

14. Bumblebee

First produced in 2001 by NERD

15. Pinstripe

First produced (in captivity) by BHB Enterprises in 2001

16. Mojave

First produced in captivity in 2000 by The Snake Keeper.

17. Butter

First produced (captive bred) in 2001 by Reptile Industries / ReptMart.

18. Stinging Bumblebee

First produced in 2006 by NERD.

19. Sugar Fly

Produced for the first time by Mike Wilbanks in 2011.

20. Sugar Spider Mojave

First produced by Fred Kick in 2012.

21. Super Fire


First produced in 2002 by Eric Davies

22. Super Pastel Butter GHI

First produced in 2013 by Sam Phillips.

23. Super Quake

First produced in 2012 by Dan Wolfe.

24. Nuclear Bumblebee

First produced in 2011 by Mike Wilbanks.

25. Orange Dream

First produced by OzzyBoid in 2004.


Information collected from World of Ball Pythons.

Saturday 22 March 2014

Photographing Reptiles

As exotic animal keepers, we all like to show off our reptiles, be it social media, blogging or to friends and family. Some people jump straight in and start snapping like crazy, and this is okay for some quick photos, but if you want more detail and photographs that REALLY show off your reptiles, keep reading.

This post will focus on camera settings and the environment in which you photograph your reptiles. Most cameras have settings for aperture, shutter speed and ISO. I use a Nikon DSLR with a flashgun to photograph my reptiles as this provides better quality. Just to explain a bit more about what these settings mean;

Aperture means the area that will be in focus. It will usually range from f2.8 (small area of focus) to f32 (wide area of focus). The lower the number, the higher the shutter speed will need to be (usually).

Shutter Speed is how fast your camera takes a photo. Do not photograph any lower than 1/60 of a second as it will not be sharp due to your hands shaking or the reptile moving too fast. It's better to photograph around the 1/125 of a second mark. This will most likely effect your aperture settings. As a bench mark, on a sunny day the settings for outside would be f8 and 1/125 of a second. So if you are photographing at 1/125 indoors, you will need a flash on your camera to compensate for the low light conditions. 

ISO is how grainy your photos will be. I always set mine to 100 as this means there will be very little if any grain visible. I would push to ISO 200 but no further.

If in doubt, play about with the settings a bit and take a few practice shots to get the settings correct. Low aperture settings are great if you want to focus on your animal's face and want the background blurred out while higher aperture settings are better if you want the whole reptile in focus. 

Environment is important for photographing. I personally like to use either white or black backgrounds as these provide a cleaner look and allows the viewer to focus on the animal, not the distracting items in the background. Some reptiles look better on dark backgrounds and some look better on lighter backgrounds. 


Mojave royal python. Mid aperture settings (f8)


Pinstripe on a white background. Low aperture (f4)

Same pinstripe on a black background. Low aperture (f4)


Ensure that your reptiles are not going through their shedding process when you decide to photograph them as this will not help to bring out their vivid and natural colours. The best time to photograph them is after a shed as this is when they are at their brightest.


Amel corn snake after shed.

Amel corn snake in shed.


Sometimes you might not have the time to set up the background or just want a quick snap to share on social media sites. This is the first photo I took of my butter royal python. Ensure it is well lit and is in focus.


Butter royal python. Quick snap.


Close ups can be stunning and can sometimes look almost human. Below is a photo of my snow corn snake which looks just that.


Snow corn snake. Close up.


Timing is also very important. This can make a difference between a good photograph and a great photograph.

Normal leopard gecko.

One second after the previous photo.


Try to get quality photographs over quantity. Anyone can take lots of photographs but a few really good photos will always trump hundreds of mediocre photos. Remember to take your time and if needs be, have someone else in the room to help you control the reptile so they don't run off while you fix your camera's settings. 


Finally

Back in October 2013 I got a mojave royal python and he went off his food. After trying a few techniques, he was still refusing to feed. I tried braining and changed his food item as I wanted to try everything before multimammate mice as royals can get a taste for them and refuse everything else. When I was feeding my snakes on Thursday night, my corns refused to eat jumbo mice. I thought instead of wasting it I will try the mojave expecting a refusal but to my surprise (I near had a heart attack) he struck and ate it. I must say, when a fasting royal decides to eat, it is happiness in a nutshell!! I just hope he will keep this up.

If anyone has a fasting royal that is a good weight (mine was 1050g when he ate) remember: the key is not to panic unless they are losing loads of weight. It is a good idea to keep records of their weight to ensure they are not losing too much weight and just be patient as eventually they should eat. 

For further information, click here.